|
|||||||
|
Tinkering |
Using the MOS 6581 SID chip (part 2)The previous article ended with a list of improvements that could be made to make the transplanted SID easier to use and to transport. In this follow-up the following items will be addressed:
Box and blinkenlights
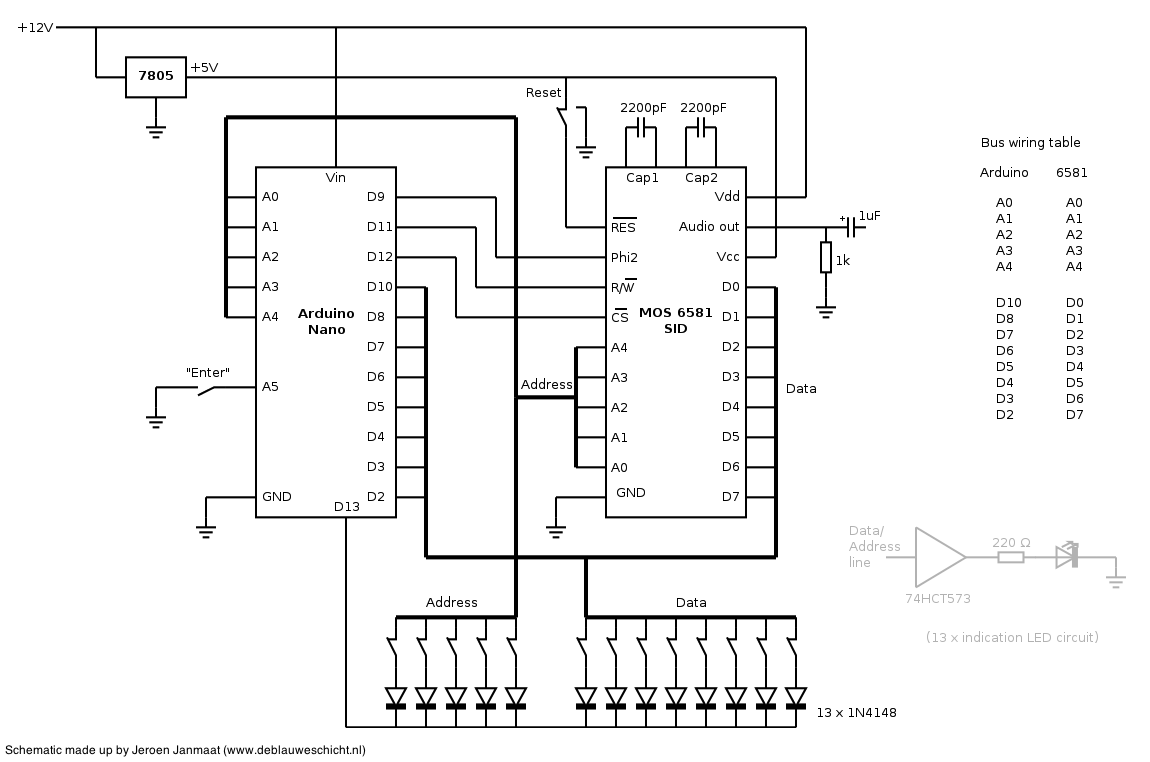
Partly to monitor activity on the address and data buses, but mostly for a pleasing visual effect, an LED can be attached to each data and address line showing the state of that line. As the Arduino cannot provide sufficient current to drive 13 LED's, external drivers are used. One example of a suitable device is the 74HCT573 "octal transparent latch" IC, which contains 8 buffers/latches (two are therefore needed to drive all LED's). Note that as the LED's simply reflect the output voltages on the Arduino, no additional code is necessary here. In the experimental implementation, two power supplies were used in order to provide the two different voltages required by the SID chip. In an opdated version of the circuit the 5V Vcc is derived from a single 12V supply using a 7805 voltage regulator. The schematic above shows this adaptation; the LED extension (which is not needed for operation) is shown in gray. The small table on the right side of the diagram shows the wiring between the Arduino and the SID, as the bold "bus" line obscures the order in which data lines and address lines are connected.
To get some measure of robustness, the breadboard circuit has been moved to Veroboard and placed in an inexpensive (yet cute) wooden box. The switches and LED's have been mounted on the lid - for that elusive "sixties front panel look" - and various sockets are situated on the rear and left side.
Serial communication via MIDITo use the transplanted SID chip as a musical instrument, it should be playable as one. Commercially available modular synthesizers generally apply the MIDI standard, where a seperate keyboard is used to trigger notes and set various parameters on the device through a serial connection. HardwareThe addition of a MIDI interface is the main reason for the inclusion of a microcontroller in the present ciruit, as mentioned in the previous article. Various websites offer explanations and examples relating to the use of Arduino with the MIDI standard; Instructables is a good place to start. In this case, only a "MIDI IN" connection is needed. Enabling an Arduino to read data from a MIDI port involves an optocoupler, electrically isolating the device is from other equipment. Apart from that, communication is similar to any mono-directional serial link. In the case of a 328-type Arduino (that is, with a single serial port) - like an Uno or a Nano - the MIDI input data link is attached to digital I/O pin 0 on the microcontroller - otherwise known as the "RX" pin - which is also used for serial communication with a host PC. As the standard MIDI bit rate is 31250 bps, which is not normally supported for serial communication between computer devices, the serial connection can only be configured for one of the two link types at any one time, either MIDI or RS232. Furthermore, to allow uploading of sketches or to do any type of communications with the Arduino from a computer, the MIDI interface must be electrically disconnected or disabled. The output of the optocoupler reflects the state of the MIDI link, which would interfere with incoming data.
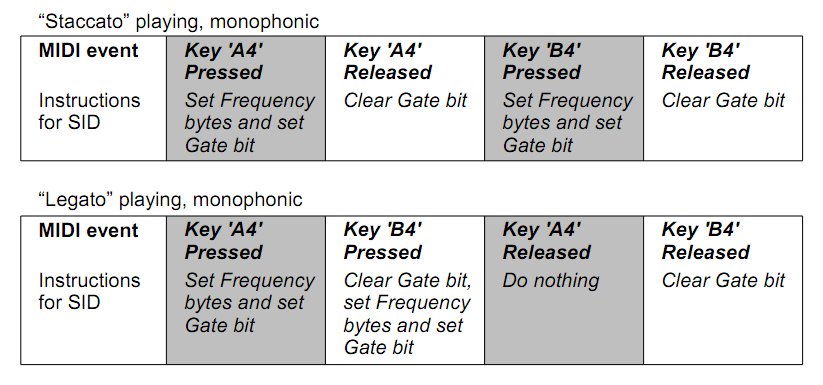
Software As to the interpretation of MIDI data and the measure of control that a remote keyboard is given, there are many possibilities - this is where the real fun starts! The simplest practical implementation would be that of a monophonic synthesizer - that is, using a single voice on the SID - with a fixed set of parameters for waveform and ADSR envelope. In such a case, the only data transmitted are "note on" and "note off" messages. The software has to interpret the MIDI data; whether a key is pressed or released, calculate the low and high frequency data bytes for the SID oscillators corresponding to the requested note, and to set the gate bit to start a sound and clear it to stop it. It may appear straightforward to translate MIDI messages to SID instructions, but matters quickly become more complicated when applied to actual use. While playing quick passages on a musical keyboard for example, a key may be pressed before the previous one is released (a condition similar to "roll-over" with alphanumeric keyboards). The SID requires that for a voice to be retriggered after a previous event, the gate bit must first be set to zero. The table below illustrates these different sequences. It becomes clear that some bookkeeping is necessary to properly process incoming data.
There remain many possible extensions of the functionality. The SID features three voices, so that limited polyphony is possible. Furthermore, oscillator frequency and filter settings can be adjusted on the fly on SID, so that glide, pitch bending and other typical synthesizer effects can be applied for more expression. Other features of the SID that have not been discussed here are the OSC3 and ENV3 registers that derive data from the state of the third voice; incorporating these allows feedback to achieve some modulation effects. This is work for another time however; use the link below to download an Arduino sketch of the simple monophonic implementation. SID mono synth sketch for Arduino Credits/useful URLs
(Originally written 2013/05/22 and 2013/05/31)
|