|
|||||||||||||||||||||||||||||||||||||||||||||||||||||||
|
Tinkering |
The Commodore 64 keyboard as a Bluetooth HID (for an iPad)(Note: In the meantime, the BlueSMiRF HID Bluetooth module mentioned below appears to have become difficult to obtain. I don't know of a replacement (yet); for now I will leave this page as it is for the perusal of the curious.) IntroductionThe Commodore 64 is an iconic eight-bit computer that was introduced in the early 1980's. Partly because of an aggressive marketing campaign this machine attained great popularity and was produced in large numbers for about ten years in various incarnations, the most well-known being the "bread bin". This was a time when computers like these were known as "home computers" and entire (printed!) magazines - not to mention whole tribes of followers - were dedicated to the machines of a single manufacturer.
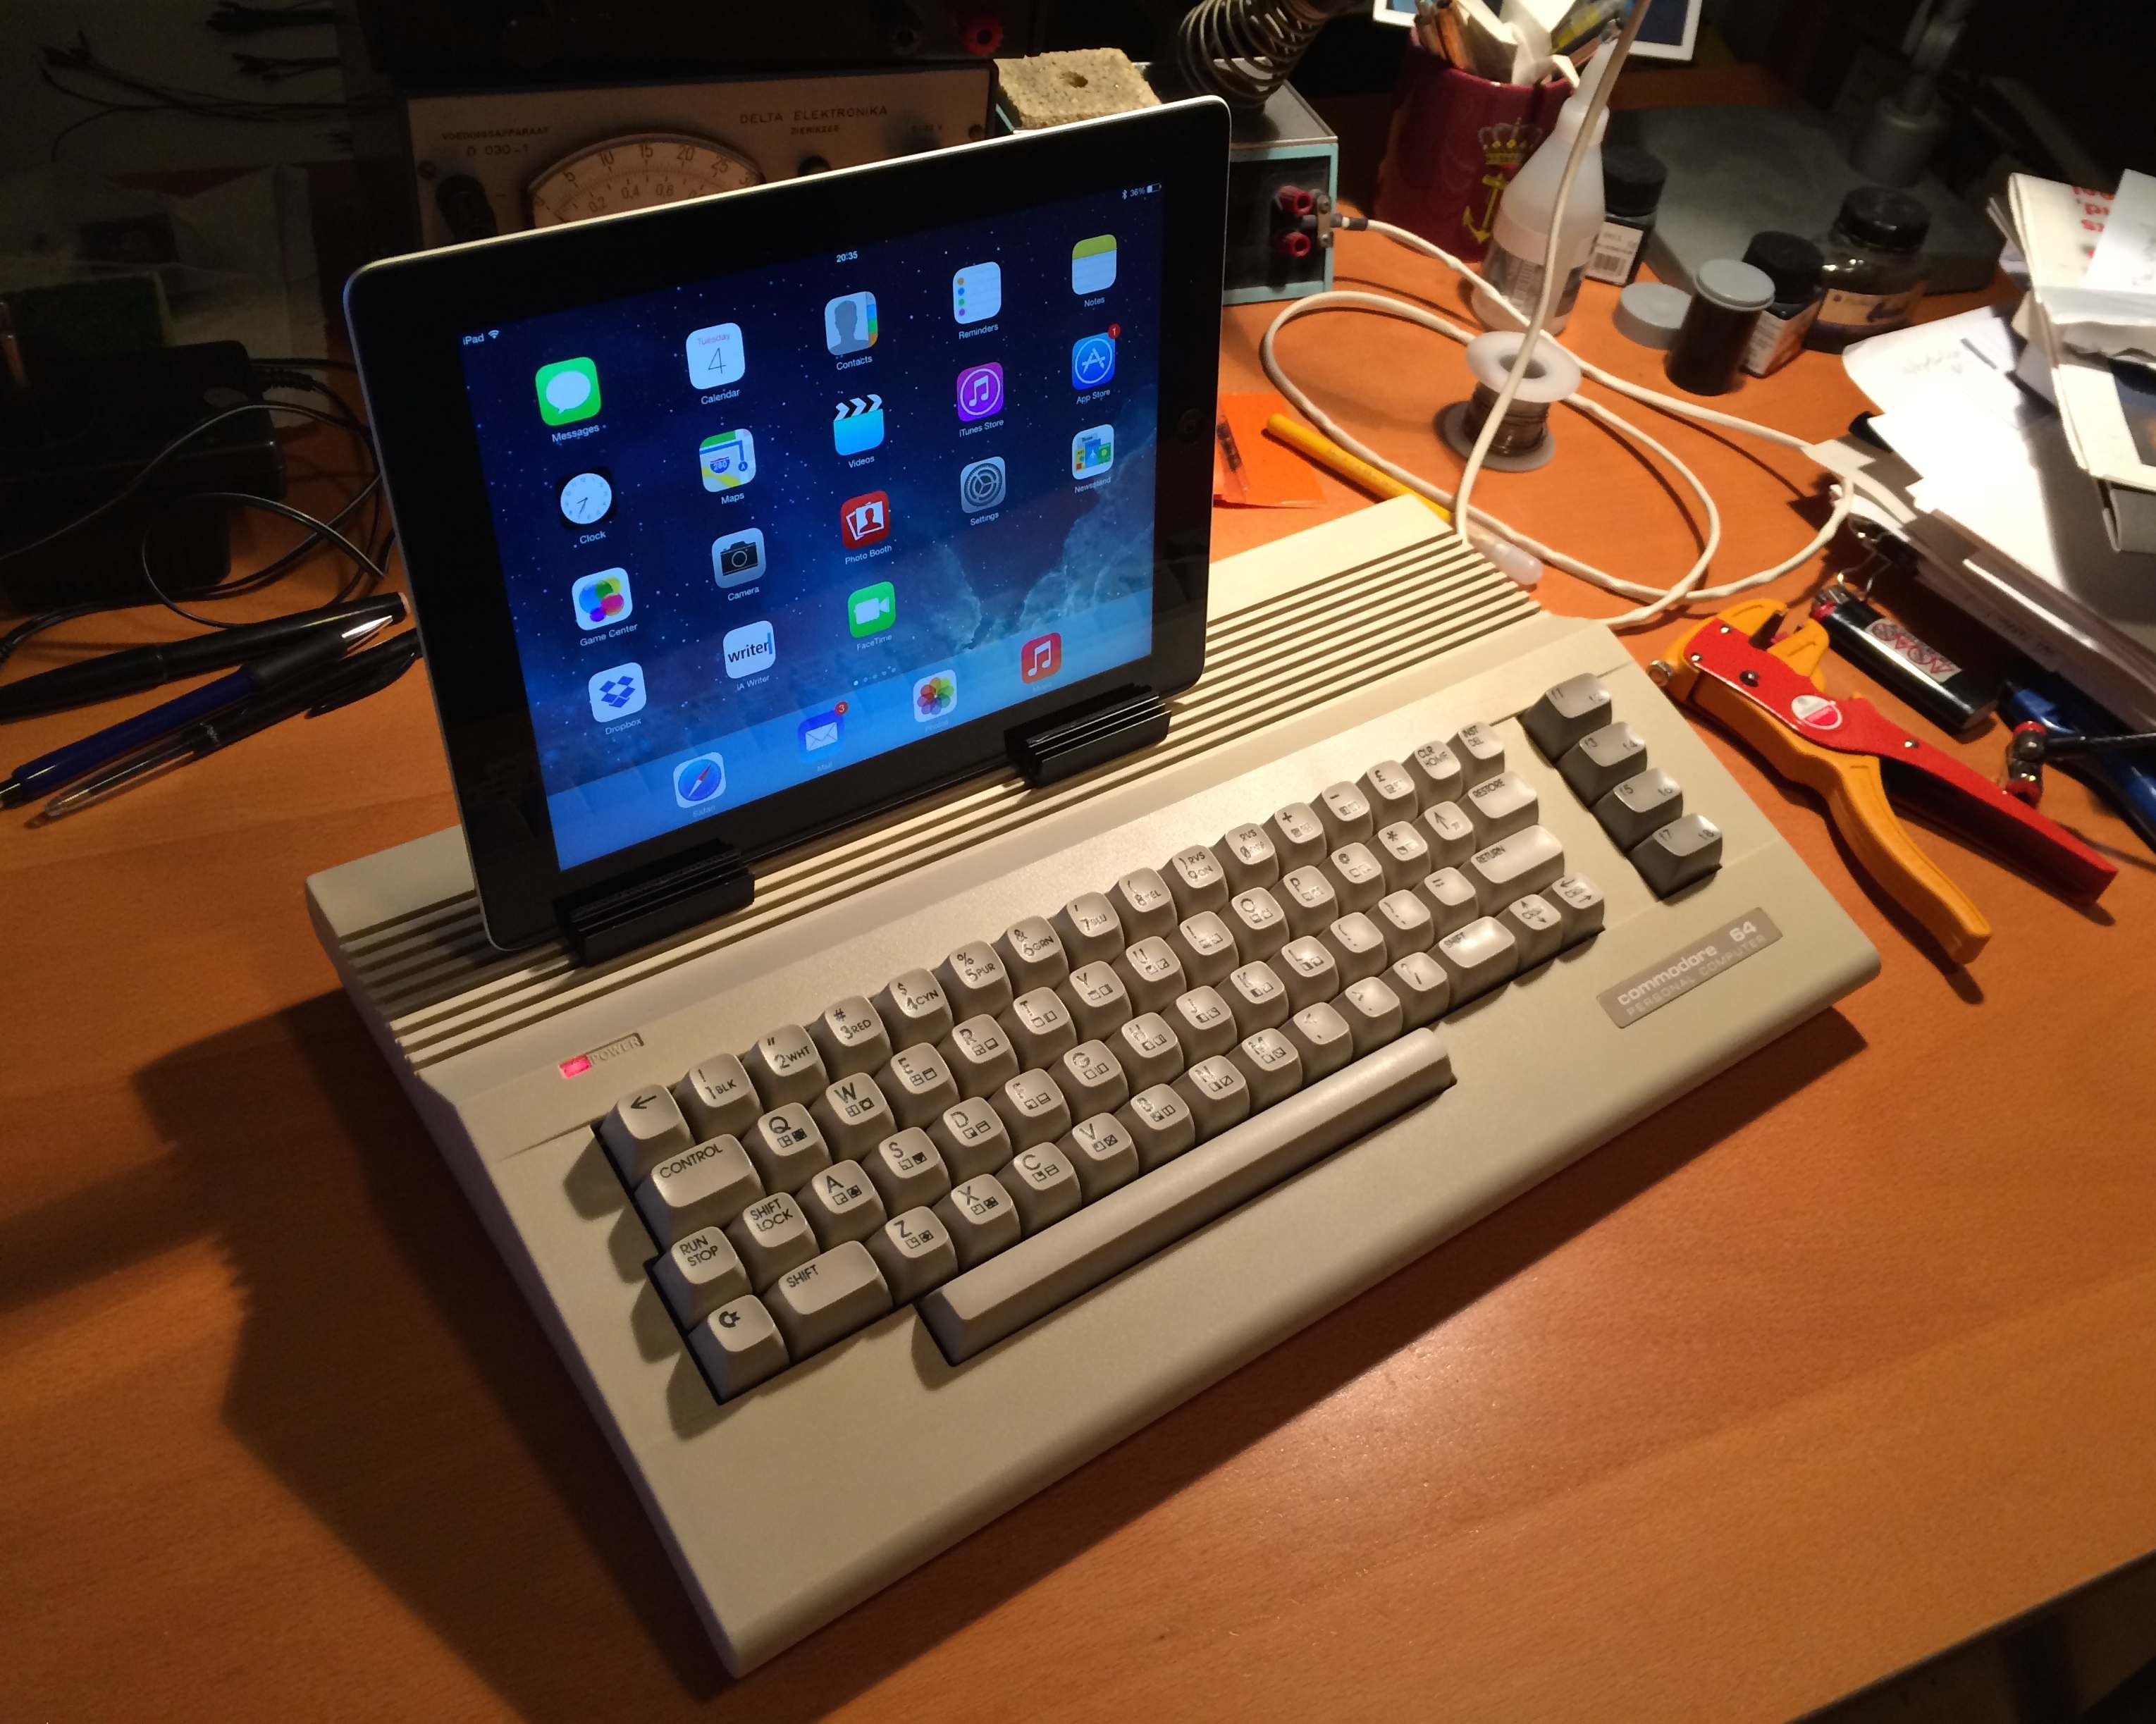
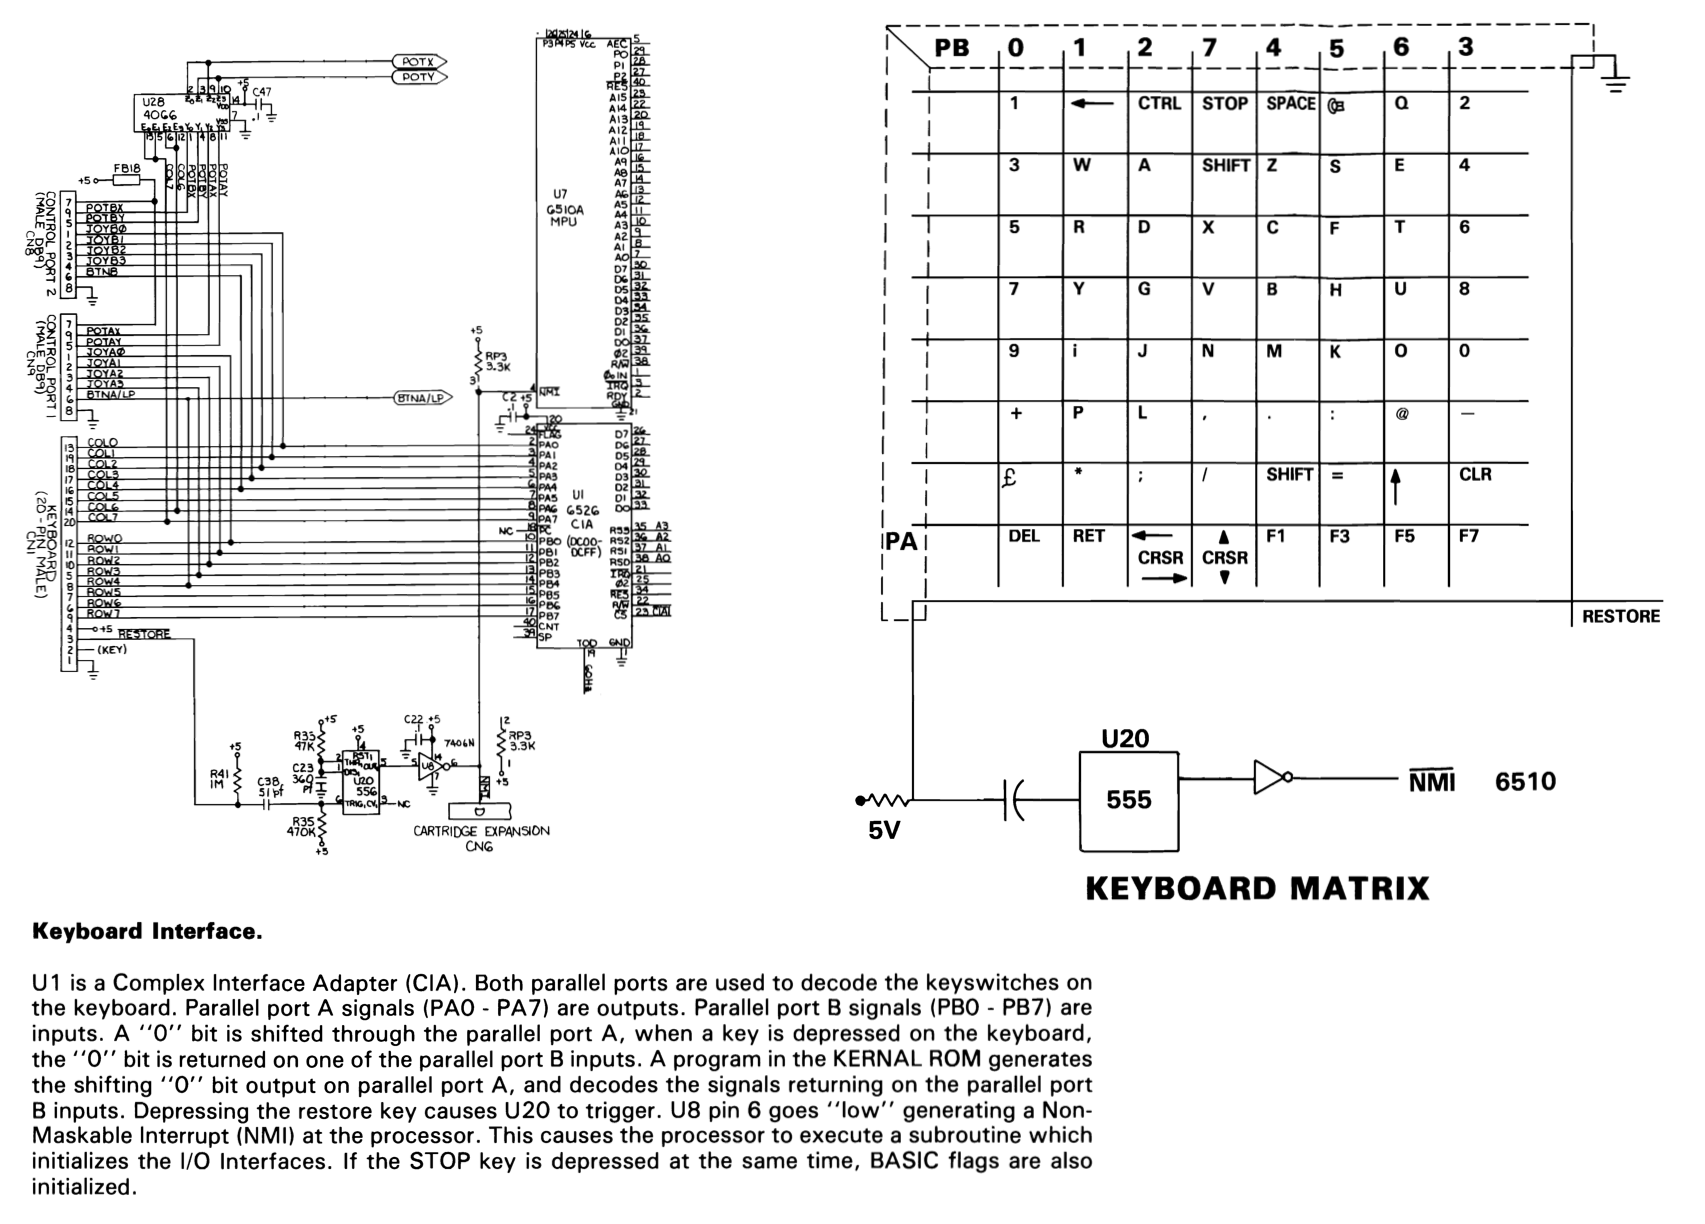
One of the specimens in my possession (if you are as old as I am you probably have at least 1.5 C64's in your collection) is a nice unyellowed C-type. The C64C is a cost-reduced version with a case resembling the equally amazing multi-mode Commodore 128 - see the photograph above. Some while ago it occured to me that the C64 might make a nice iPad keyboard and stand all in one. I imagined that it wouldn't be too hard to do and went to work. There was one constraint: the C64 to be used was in good condition and it should remain possible to return it to its original state. The central components used are an ATMEL 328p microcontroller and a BlueSMiRF Bluetooth HID module. The ATMEL was programmed using the Arduino development tools. Interfacing with the keyboard matrixThe keyboard consists of a matrix of eight rows and eight columns, with a key on each crossing. When a key is pressed, the crossing becomes an intersection and a row is joined to a column. The 8+8=16 lines (plus two others for the RESTORE key) are connected to CN1 on the C64 main board. A very useful illustration of the matrix lay-out can be found in the Commodore 64 Service Manual.
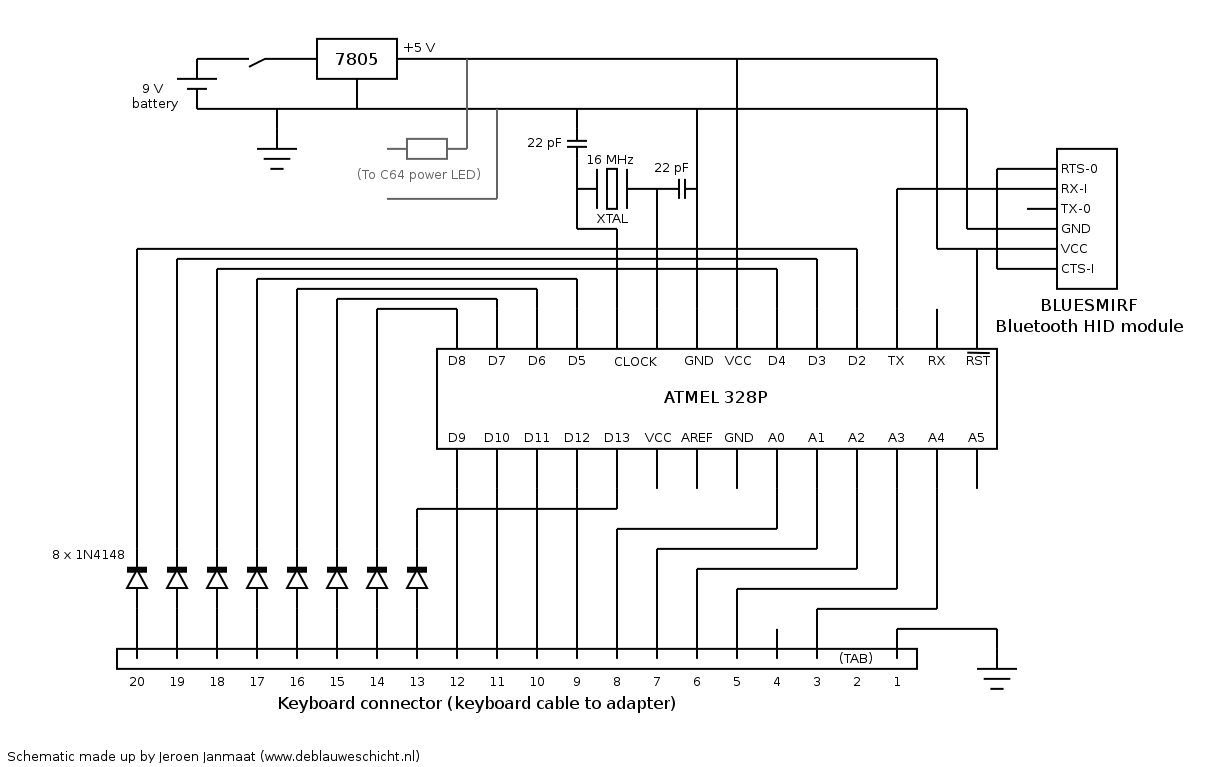
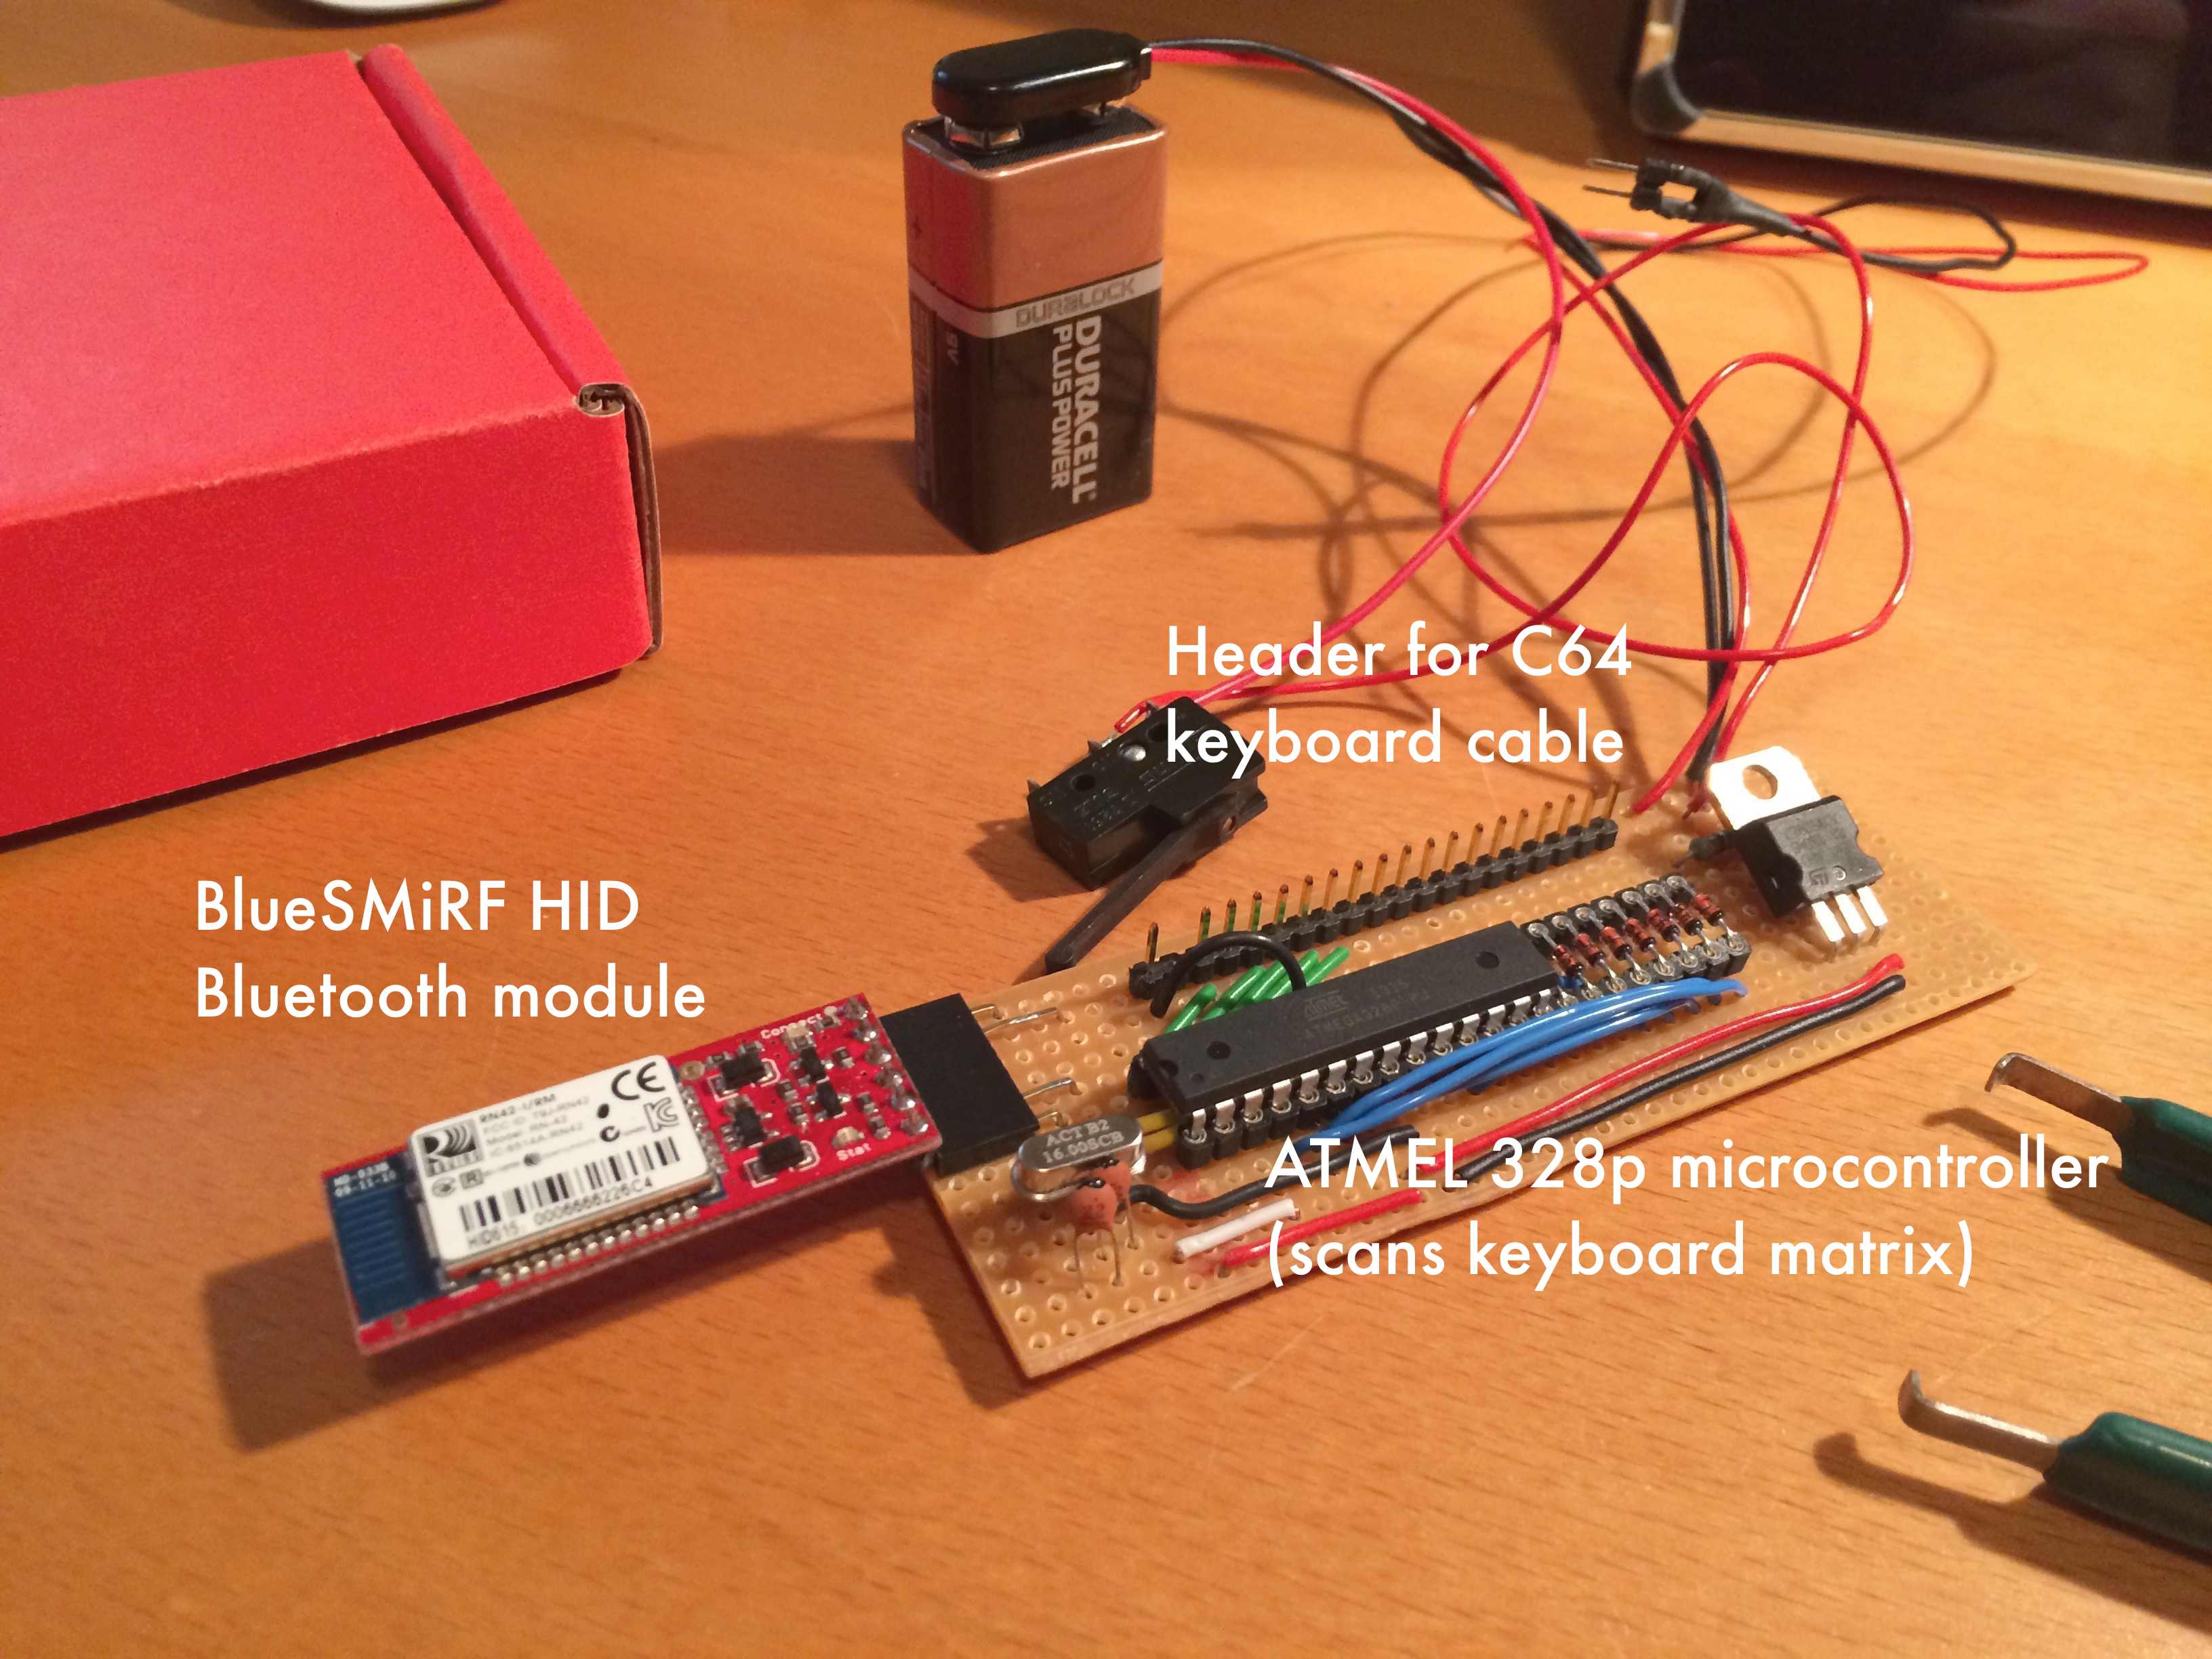
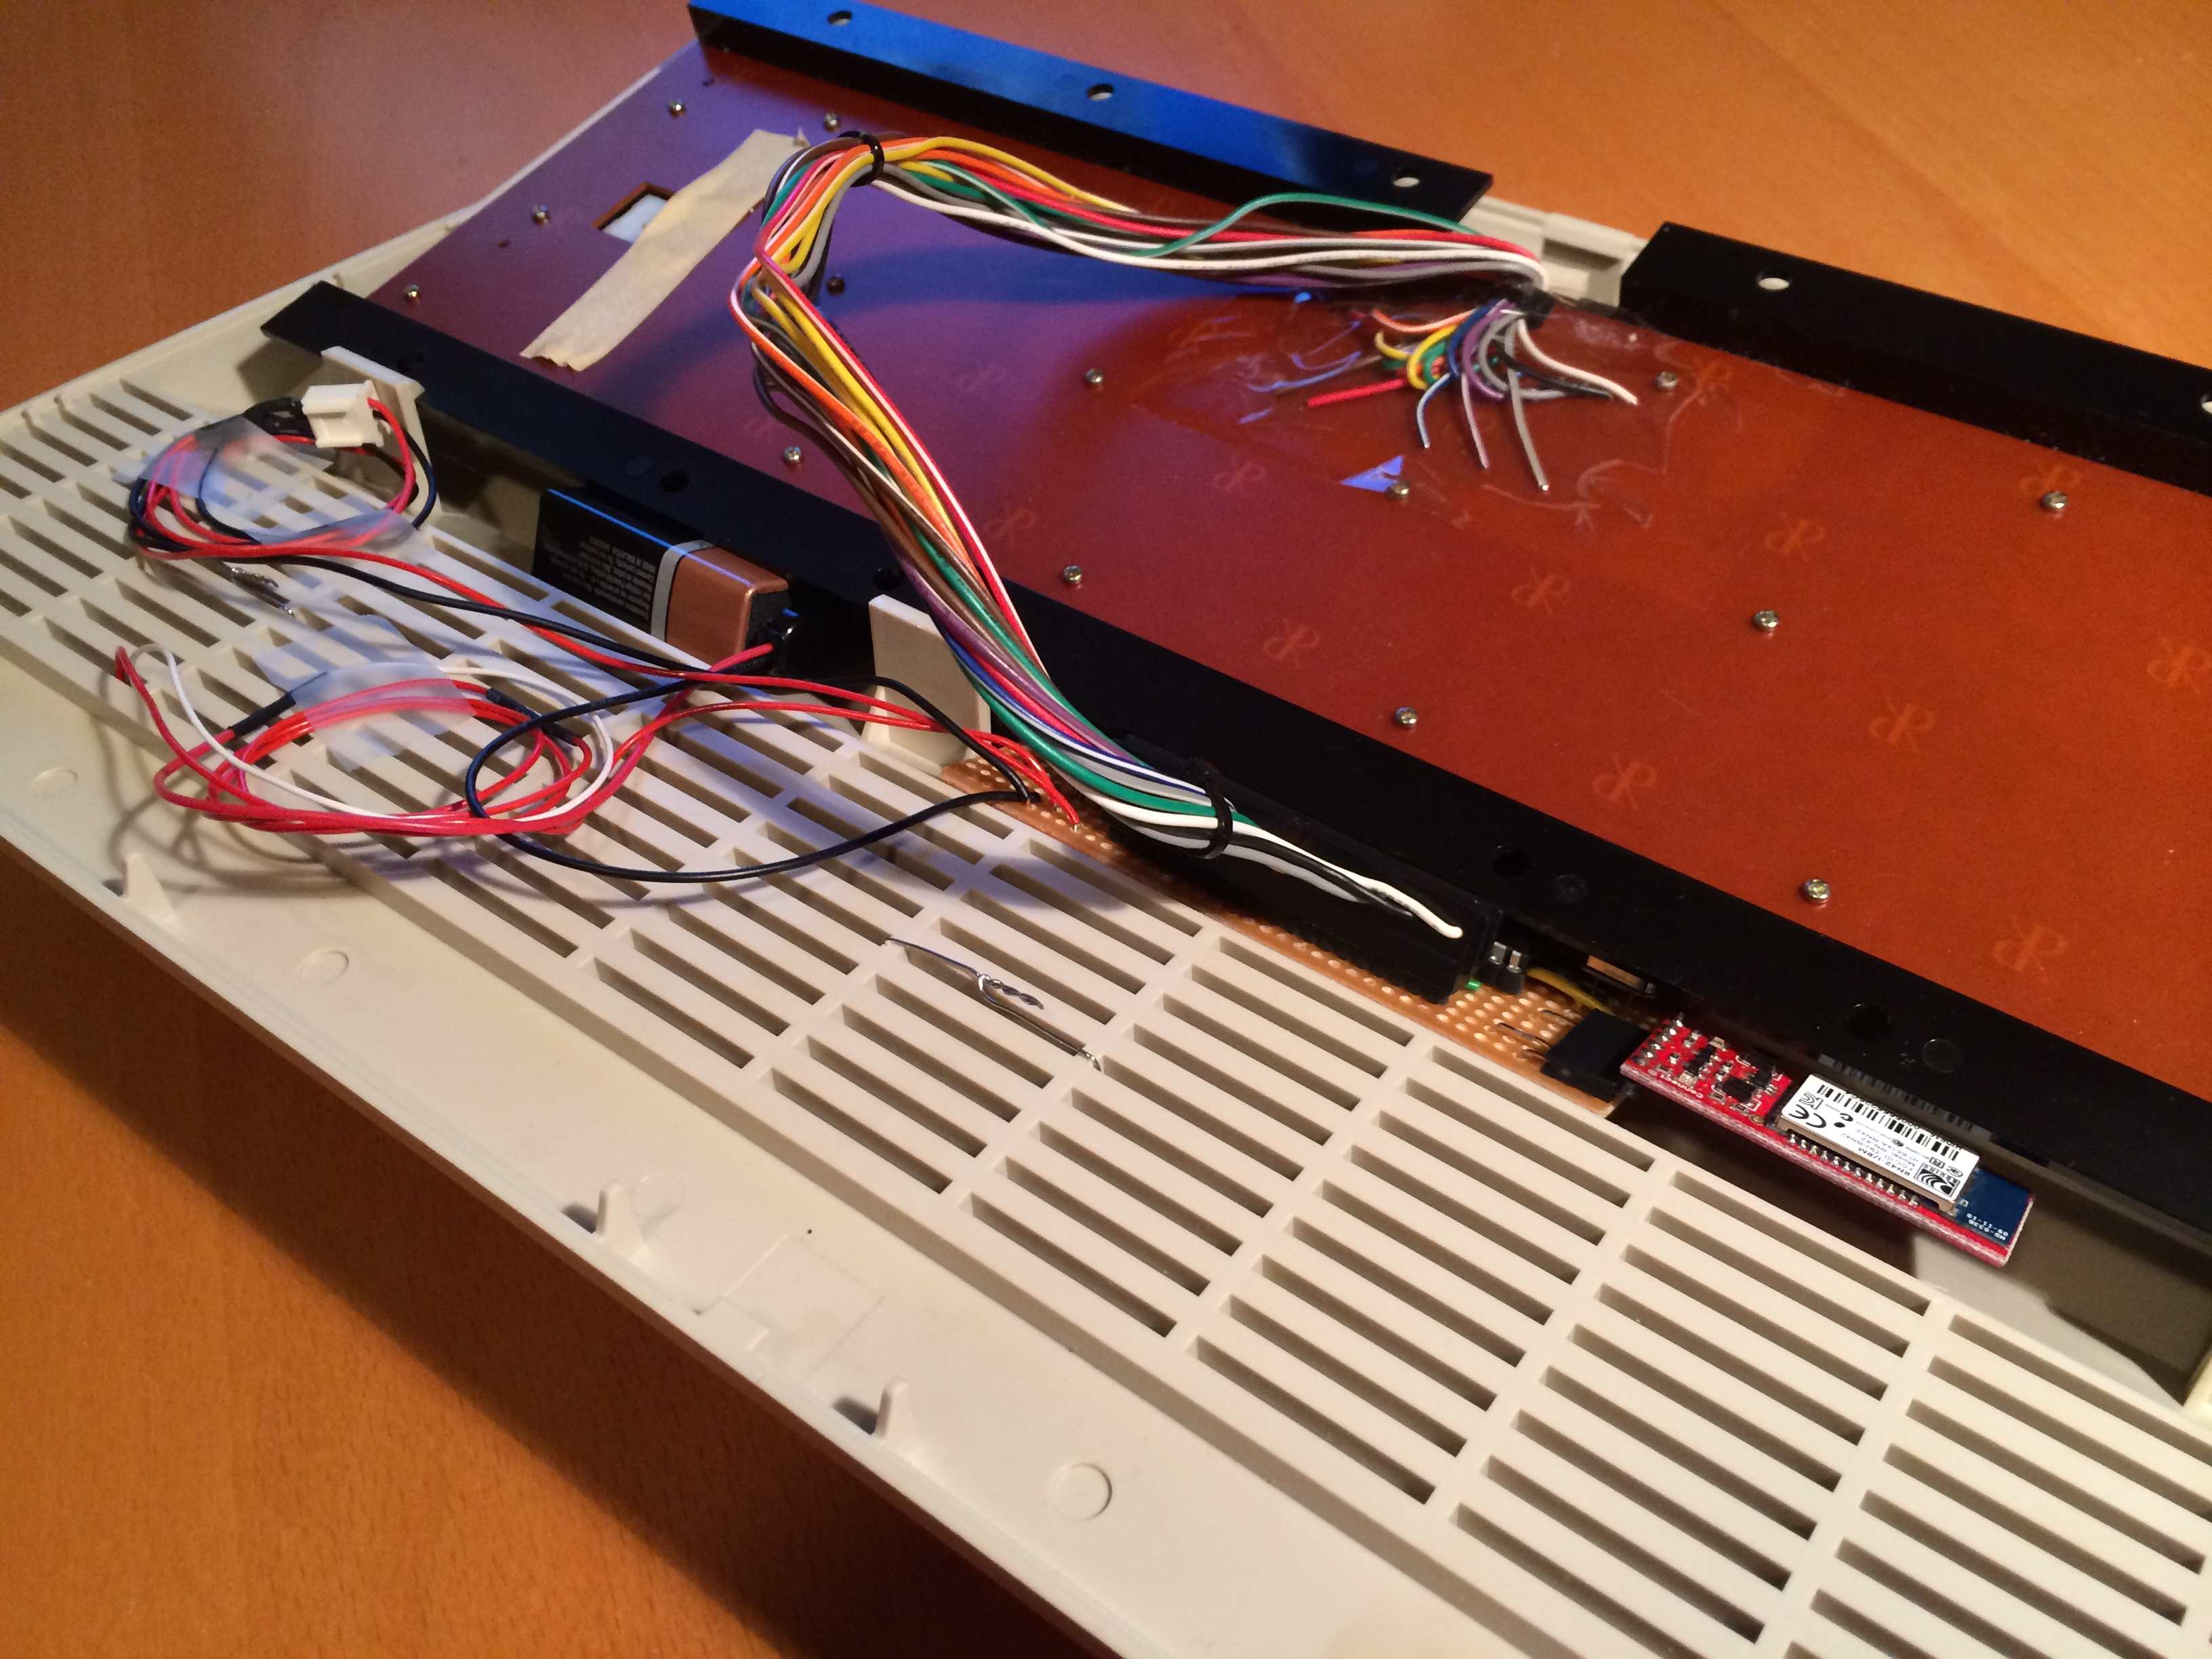
Detecting pressed keys is fairly straightforward. The keyboard cable is removed and attached to the ATMEL microcontroller as shown in the schematic below. The column lines are attached to the microcontroller's outputs D9-D12 and (reconfigured) A0-A3; the row lines are connected to D2-D8 and D13 (with the built-in pull-up resistors switched on). There is one extra line for the RESTORE key, which has a special function and effect on the C64, but is scanned by the microcontroller as a normal key on pin A4. Detected keypresses and releases are mapped to matching Bluetooth codes and sent to a BlueSMiRF HID Bluetooth module.
The circuit is powered by a 9V battery, using a 7805 voltage regulator to obtain 5V. The C64 power LED is wired to the device as well.
Configuring and using the BlueSMiRF Bluetooth moduleThe BlueSmirf HID is initially set to TTY mode. In order to have it work as an HID, a SparkFun FTDI Basic Breakout Board is used to change settings. The FTDI board provides a USB to 5V or 3.3V serial interface, so that one can communicate with the Bluetooth module using a serial console, such as Hyperterminal in Windows or the CLI command "screen" in Linux. The following steps are to be made:
The BlueSMiRF should now be ready to use. Wiring the module to the microcontroller involves powering it with the same 5V used for the ATMEL and connecting "RTS-O" to "CTS-I". Pin "RX-I" is connected to the TX pin on the ATMEL and the "TX-O" is left open, as communication is one-way only. Keyboard mappingThe firmware running on the microcontroller is currently tailored for iOS devices, as that's all the tablet and smartphone hardware I have in my possession. The age difference between the C64 and iPad keyboards turned out to be not too great to bridge; it's mostly a matter of wiring the lay-out in software. Some adaptations and augmentations are necessary (if only to be able to get curly braces or a backslash). Note that this is not a fully featured n-key rollover implementation; it suffices for iPad however. The "CBM" key is of course a logical choice for the "Command" or "GUI" key, but this does not feature very prominently in iOS, although it can be found on both Apple's and third-party Bluetooth keyboards sold for the iPad - those offered by LogiTech, for example. The Alt modifier key is more important; it is used to enter diacriticals and foreign or rarely used symbols. The "Restore" key is assigned to that function. The C64 keyboard already features Control and Shift keys, and these are naturally used in that capacity. The Shift keys on the C64 keyboard matrix are wired separately (unlike those on the Apple iie or Sinclair QL). This is used for some much-needed fine-grained modification of the cursor and Clear/Home keys. The right shift modifies the direction of the cursor keys, entirely in the style of the C64 OS itself. The left shift key enables select, in the manner of modern keyboards. Left shift + right shift + cursor left results in "move and select one character to the right of the current cursor position". Normal keys behave non-discriminantly with regard to the shift keys. The software has been written for the popular Arduino Uno using the Arduino development software. After prototyping was done, the ATMEL 328p was extracted and placed on an experimenting board (see photo above). C64 to Bluetooth sketch for Arduino The table below gives an overview of some special keys and key combinations. Note the assignments of the function keys and the modifier-and-key combination needed for some modern OS-related keys. Other keys will behave as their marking would suggest (although the graphical symbols are not supported).
Assembly and a sort of stand thing, tooOnce the soldering and prototyping is done, the board can be fitted inside the C64. It turns out there is a narrow space between the rear edge of the keyboard and the top case, and that both battery and electronics fit there very well indeed. The wiring is tamed using office tape.
The flat rear surface on the C64C provides an area to set the iPad, provided some way can be found to keep it upright. In an electronics shop I found some used "slotted" heat sinks that would serve for this purpose. I like heats sinks; they simply look cool (note: there is a pun nearby). No permanent changes were to be made to the case; no screws could be used or new holes made. I found that the heat sinks could be fixed in place using thin metal wire that fits through the grille on the flat rear section of the C64C. The slot where the tablet would sit was then padded with thin rubber sheet to prevent scratches on the aluminum exterior. A microswitch is mounted to one of the two heat sinks, which is wired to the battery. By placing the iPad the switch is pressed down, activating the electronics.
This construction is of course not necessary; any normal iPad stand could do the job just as well. I just liked the notion of the Bluetooth keyboard being turned on by placing the tablet in its stand. Another earlier and untried idea was to modify the rear of the machine, detaching the rear and employing a flip-up mechanism. To doThe possibility to keep the keyboard connected to the C64 main board, so that the former can be used in two modes. However, in unpowered state the 6526 CIA doesn't play nice with the current incarnation of the scanning circuit, so that needs some thinking. Also some means is required for the microcontroller to detect whether the computer is turned on, and in that case to stop it scanning the matrix in order to let the C64 have priority there. Credits/useful URLs
(Originally written 2014/03/04)
|